
You probably already have a Facebook page for your company? You have made posts, and now it is time to start running targeted ads? For that you need a Facebook Ads Manager account. It is a platform that contains different tools, accesses and accounts: See on platvorm
- you can submit and monitor ads
- you can manage pages and ad accounts
- add other people and marketing partners
Campaigns and ads
Effective and user-friendly! Facebook ads are more than just a quick way to market on the world’s biggest social platform. They are also a way to create mobile ads and Instagram ad content. The best way to understand how to use the service for maximum benefit is trial and error, but understanding how Facebook builds its ads and which rules to follow gives you a solid base for creating your campaigns.
How to create a Facebook Business Manager account?
If you do not have a Business Manager account yet, go to https://business.facebook.com, click “Create Account” and follow the instructions. https://business.facebook.com
NB! It is important to distinguish between Facebook Business Manager and Facebook Ads Manager.
All the steps to a Facebook Ads Manager account and adding a payment method
NB! Since Facebook changes things quite often, and creating your very first ad account is slightly different, the views shown here may differ from what you see on your screen, but the path is easy to find and this guide should still help. You are always welcome to send feedback to info@assistent.ee if you find that something has changed!
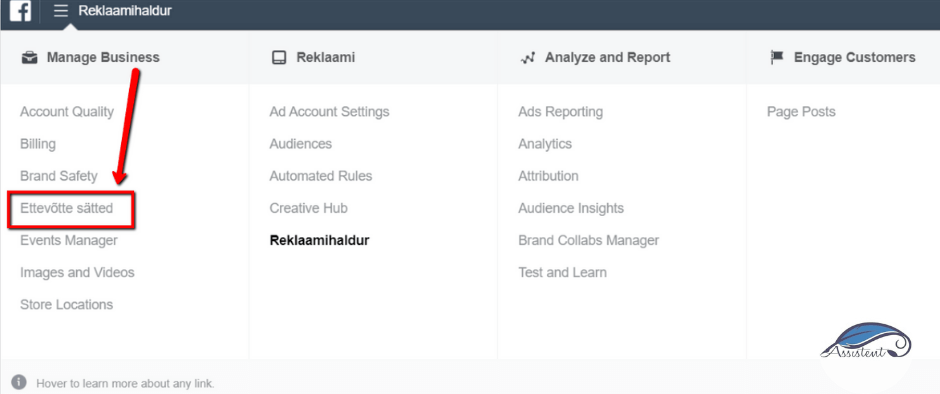
1. Open the menu in Business Manager, then Business Managing and the business settings:
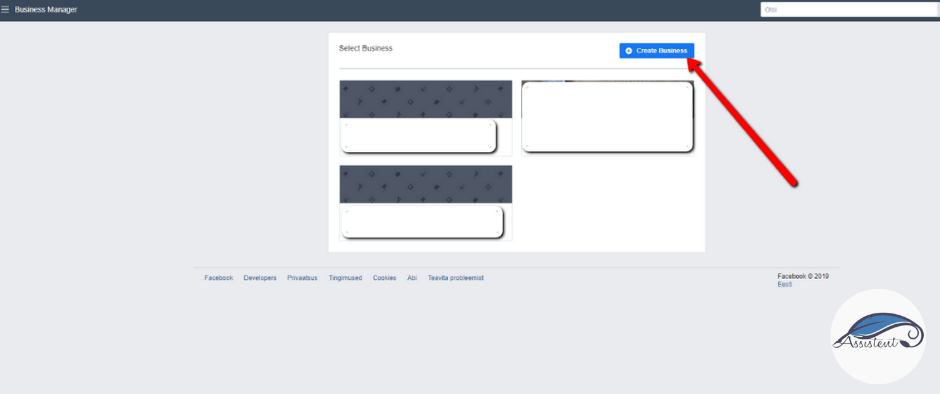
2. Then click “Create business“:
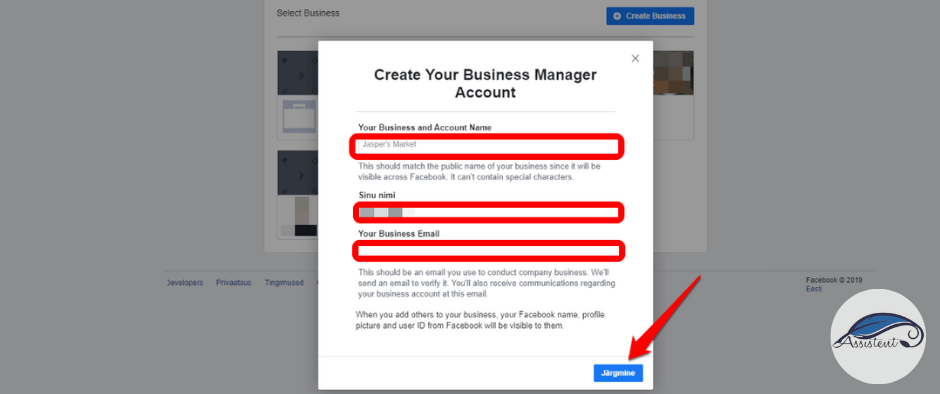
 3. Fill in the fields in the window that opens and click “Next”:
- Your business and account name (it is recommended to use your company’s official name)
- Your name
- Your business email address
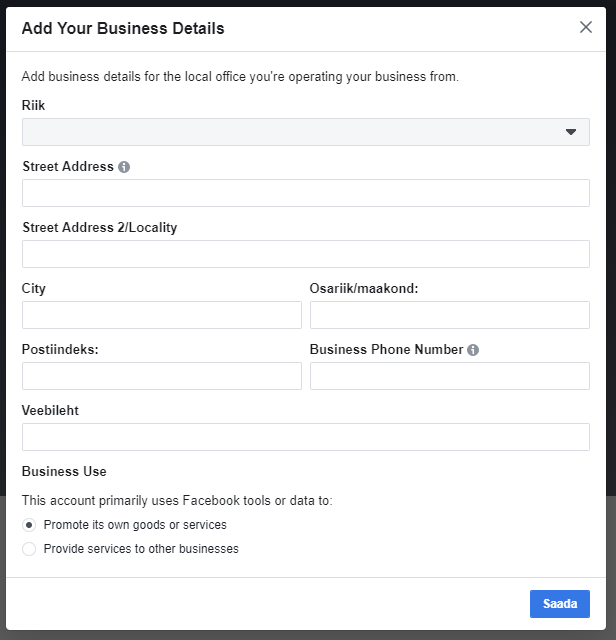
 4. A new window opens. Fill in the followinglahtrid ja “Saada”:
- the company’s location details
- the website address
- the purpose of the account: promoting your own page or providing services to other businesses
5. Vajuta nupul “Valmis” ja mine korraks enda postkasti. To confirm the account, an email is sent to the address you entered. Confirm the details by clickingConfirm Now“.

6. Muuda profiilipilt ja kaanepilt:
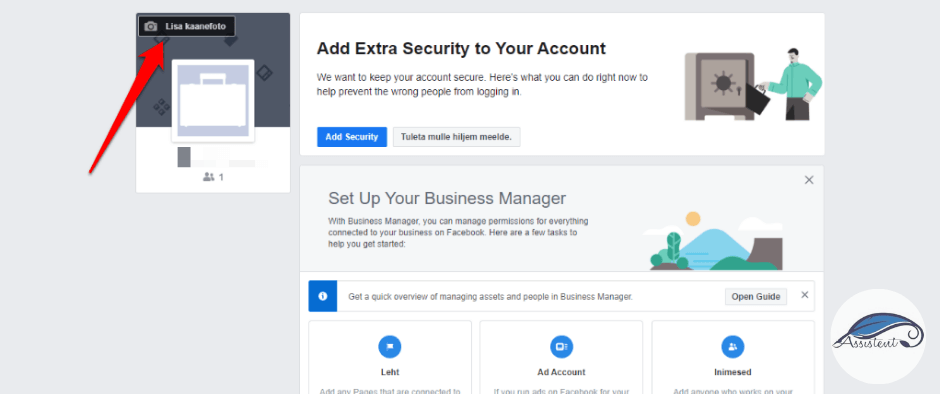
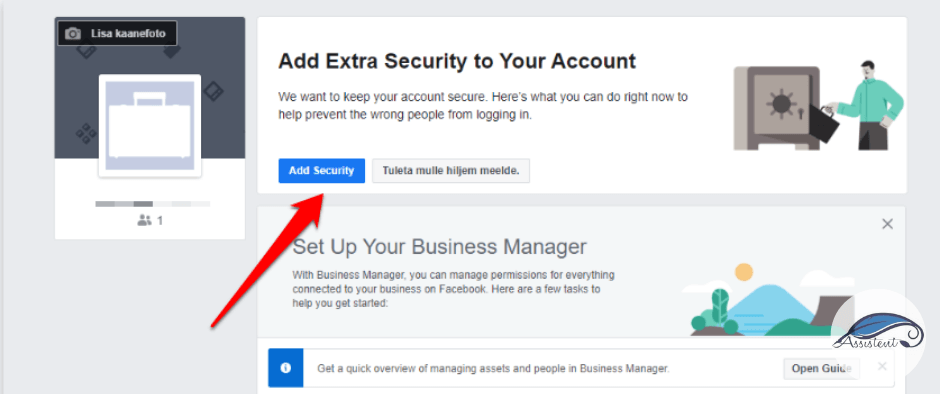
7. Click “Add security”: “Add security”:
8. Jand then fill in the blocks (two-factor authentication; appoint an admin if needed):
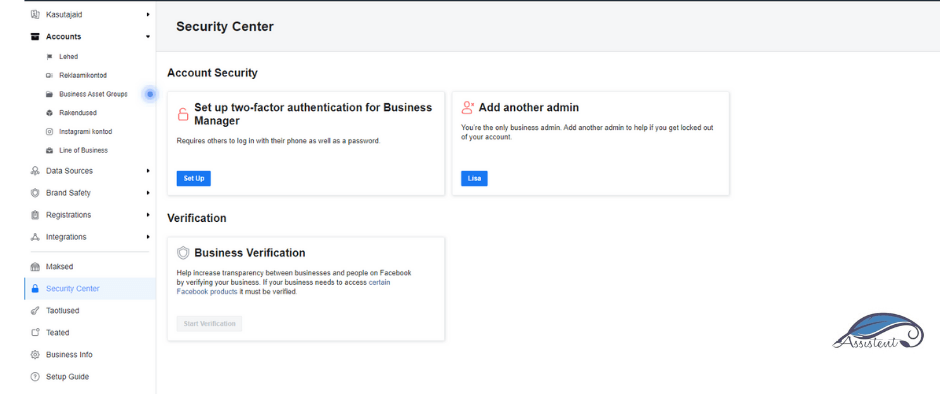
9. Then go back to the previous page and fill in the other blocks as well:

10. Kui avad valiku lehe andmed Add Page, siis vali Add a page of your own (if it is for your own company; the other option is for managing others):

11. Lisa siia enda Facebooki lehe aadress ja vajuta Add page:

12. Then choose Add Ad Account

13. Then (for your own company) again Add Ad Account:
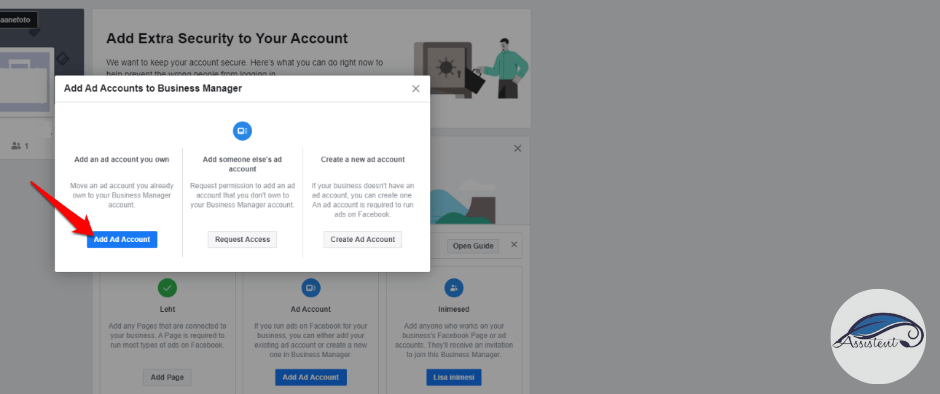
14. Sisesta ID (keep in mind that ad accounts added to Business Manager cannot be removed later)

Adding a bank card in Facebook Ads Manager
15. In the left menu choose Maksed ja Lisa:

16. Fill in the fields and click “Continue”:

17. And then off to Ads Manager to create your ads! Here is some more advice:
Creating a campaign
Facebook organises your ads by campaign. Here you set the goals for the ads created under a given campaign so you can track their success. For each campaign you choose one ad objective. Track page post engagement, how many likes you get during the campaign and how many clicks your website or its conversions receive. Other options include app installs, event responses, offer claims and video views.
Organising the ads
Under each campaign you create ad sets. The sets are grouped by how you target the ads in that set, where the ads are placed, and what your budget and schedule are.
Eelarve: set the maximum amount you want to spend daily or over the whole campaign.
Ajakava: decide whether you want the ads to run continuously or during a certain period.
Paigutus: ads can appear on desktop as well as mobile. Desktop options include news feed ads and the right-hand column; mobile options include news feed ads and ads on mobile sites and apps outside Facebook. You can also create sets that appear on Instagram.
Targeting: the beauty of Facebook ads is your ability to create a targeting filter for every set you build. The options are many, including targeting by basics such as:
- Gender
- Location
- Age
- Language
- Education
You can go a bit more personal too, filtering by data such as:
- Birthday
- Likes
- Interests
- Relationship status
- Relationship interests
- Workplace
- Connections and friends of connections
Group the ads you want to create by these criteria. Then you are ready to create unique ads under each set.
Creating the ads
Now it is time to let your creativity loose and design the ads. Use a virtual assistant’s help if needed. If you are just starting, Facebook Ads Manager is quick, easy and intuitive; as you get comfortable and start seeing which campaigns work, the editor gives you a bit more freedom. It is also the only way to create Instagram ads. Create ads that appeal to the audience you chose for the set, and keep these tips in mind:
- Test different ad designs to find what works best. Use two different images with the same copy, two different copies with the same image and so on, to see what works and what does not.
- Photo-based ads tend to perform better than illustration-based ones
- Include testimonials or strong business arguments in your copy to create social proof
Following the guidelines
Facebook reviews every ad you create before it goes live. It generally takes about 24 hours, and as long as you follow their guidelines you should be fine. Definitely review Facebook’s official policy, but here is the core. Ads may not:
- directly or indirectly refer to any personal attribute such as race, religion, age, beliefs, sexual orientation, disability, financial status, name or gender identity
- contain any adult content, including suggestive or explicit content or nudity
- link to content flagged on Facebook or Instagram, whether written or visual
Combining low costs, wide visibility and unmatched targeting options, Facebook ads offer business owners an effective, wallet-friendly marketing channel.
How to add people to your Facebook Ads Manager account?
If you cannot, do not want to or do not have time to handle the ads yourself, it is wise to delegate the task, whether to your employees or to virtual assistants. To do that, you need to add people to the Manager. Adding people, and giving them different rights, is very simple.

In the left menu choose “People”. This shows the list of people who already have access.People“. This shows the list of people who already have access.
To add new people, click “Add”.Add“.
In the window that opens, enter the email addresses of the people you want to give access to, and mark which right to grant them: Employee or Admin. Employee or Admin.
Admin access allows control over all components of Facebook Business Manager, including editing and deleting the business page and adding or removing people.
Employee access allows viewing the information in the business settings, but not changing it. Finance analyst ja Finance editor. With these rights they can, respectively, view or edit everything related to invoices and payments:
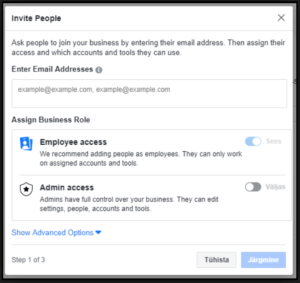
Moving on to the next step, you can give the added person or people different rights for each page separately:
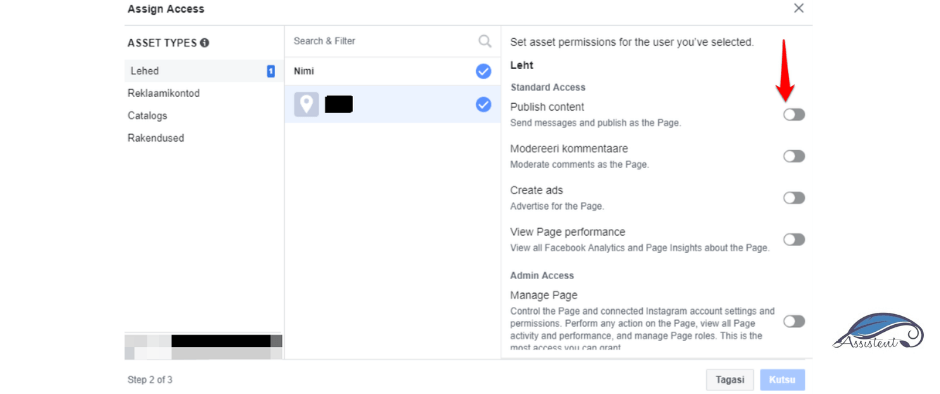
Once the people are added, all that remains is to agree on the ground rules together and get back to leading the business yourself!
If this article was useful to you, click “Like”, and if it could interest your friends as well, click “Share”.
Thank you for your feedback!